Azure Container Registry – repository permissions, to manage access to specific repositories within your Azure Container Registry, you can utilize repository-scoped tokens for more detailed control. While Role-Based Access Control (RBAC) allows you to assign permissions for the entire Container Registry, these repository-scoped tokens enable you to tailor access at a more granular level to individual repositories.
Use Cases
Here are some scenarios where repository-scoped tokens are ideal:
- Granting IoT devices unique tokens to fetch an image from a particular repository.
- Allowing an external organization access to a designated repository.
- Regulating access to repositories for various user groups within your organization, such as giving developers who create images for certain repositories write and read permissions, and offering read-only access to teams responsible for deploying from those repositories.
Azure Container Registry – repository permissions – Terraform components
To establish this setup using Terraform, the following components are required:
- Azure Key Vault: This is where the generated token will be stored for security, as it’s only accessible post-creation.
- Azure Container Registry: The registry where tokens will be created for.
- Scope Map: This acts as a permissions blueprint, allowing you to define which repositories are accessible and the level of access permitted.
- Token: This is the actual token resource. You need to create a token for the chosen scope maps (multiple scope maps can be linked) and registries.
- Token Password: This represents the token’s value. When you create it, you set an expiration date. It’s important to note that changing the expiration date will prompt Terraform to regenerate the token value, rendering any previous values obsolete and restricting access to the repository for users with old tokens.
For just the Terraform script, you can download it directly from the provided link. For a more detailed explanation, including some interesting Terraform functionalities, refer to the section below.
Repository permissions – repository permissions – relations
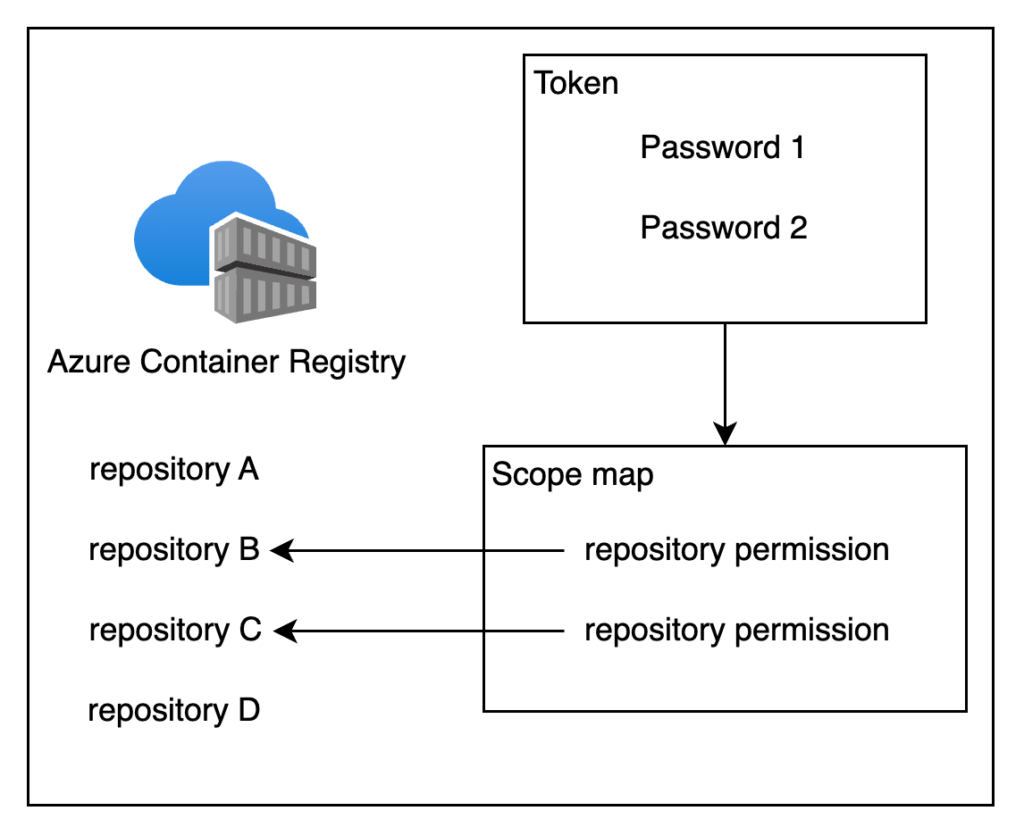
In the below diagram, I explain dependencies between resources for granting access using repository permissions:

In the Scope Map, you set the repository access levels, and then you generate a Token linked to this specific scope map. Following that, two passwords can be created for the token. These passwords are utilized for authentication in the Azure Container Registry.
Azure Container Registry – token usage
Once you’ve created a password for a token, you can use it to access the registry. The command for this is shown below:
docker login -u TOKEN_NAME -p PASSWORD_VALUE ACR_NAME.azurecr.ioScope permissions
For now, the below scope permissions are available:
| Action | Description | Example |
|---|---|---|
content/delete | Remove data from the repository | Delete a repository or a manifest |
content/read | Read data from the repository | Pull an artifact |
content/write | Write data to the repository | Use with content/read to push an artefact |
metadata/read | Read metadata from the repository | List tags or manifests |
metadata/write | Write metadata to the repository | Enable or disable read, write, or delete operations |
Terraform Setup for Scope Map and Token
In this segment, I’ll outline the process of configuring Terraform for the creation of a Scope Map and Token in Azure Container Registry. A particularly intriguing aspect of this configuration is the token regeneration process. We need to assign an expiration date to the key, but if this date is altered with each deployment, the key will be renewed. The challenge lies in controlling when this regeneration occurs.
Let’s delve into the code below to understand this better:
resource "time_offset" "key1_year" {
  offset_days = 365

  triggers = {
    "key_version" = var.key1_version
  }
}

resource "time_offset" "key2_year" {
  offset_days = 365

  triggers = {
    "key_version" = var.key2_version
  }
}
I employ time_offset to add 365 days to the current date. This date will then be set as the expiration date for both key1 and key2. Additionally, I’ve implemented a trigger for this resource, which will prompt the creation of a new value whenever there’s a change in the var.key1_version or var.key2_version variable. Therefore, to regenerate the key, you simply need to modify the value of one mentioned variable. As a result, key1_year gets updated, triggering the regeneration of our key, right?
I’ve also incorporated an important guideline: You should change only one version at a time. This is crucial because it’s necessary to maintain at least one active key to ensure uninterrupted access to the repository. This approach guarantees that access is not disrupted while updating or regenerating keys.
Furthermore, I’ve enabled the creation of multiple scope maps, allowing you to customize the parameters according to your specific requirements:
variable "scope_maps" {
  type = map(object({
    name = string,
    actions   = list(string)
  }))

  default = {
    v1 = {
      name = "messagereader",
      actions = [
        "repositories/messagereader/content/read"
      ]
    }
    v2 = {
      name = "adoagent",
      actions = [
        "repositories/ado/content/read",
        "repositories/ado/content/write"
      ]
    }
  }
}
In the above, the map variable is illustrated. Here, you designate the name and the permissions for each map. You have the flexibility to add as many maps as needed. When setting up the action, the format to follow is: repositories/REPO_NAME/PERMISSION.
I truly hope you found it enjoyable, and if that’s the case, I would be grateful for a Like or a Comment on my LinkedIn profile.
